Sida 1 av 117

Druid's 'Drema's Druidfab Attachments !!

InläggPostat: 01:20:36, 17-04-2015
av V8Druid
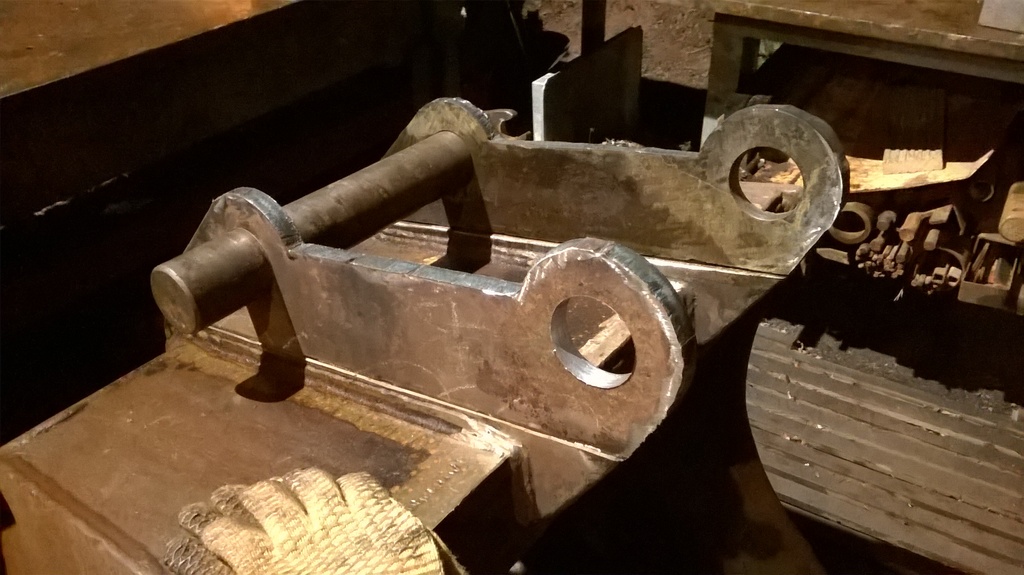
I picked quite a tidy 3 ft Geith digging bucket awhile back for a very sensible amount, :smile: but that needed a little work to make it usable on my 'Drema. :vissla:
The original hangers were too narrow and it only had 50mm pins on 380mm centres, :sad: plus one cheek plate had a slight bend in it. :eek:
Finally got around to giving it some attention two weeks ago. :thumme:

Whipped the angle out the middle first, ........

Bild
Originalets URL: http://i1275.photobucket.com/albums/y450/v8druid/buckets/WP_20150326_15_36_54_Pro_zps3fitdoox.jpg

Bild
Originalets URL: http://i1275.photobucket.com/albums/y450/v8druid/buckets/WP_20150326_15_43_48_Pro_zpshyeuqml2.jpg

.........then flipped it on its side and gave it some with the 'axe'!! :smile: :smile:

Bild
Originalets URL: http://i1275.photobucket.com/albums/y450/v8druid/buckets/WP_20150326_16_13_36_Pro_zps0ytes7vm.jpg

quick tap and oops!! :uupps:

Bild
Originalets URL: http://i1275.photobucket.com/albums/y450/v8druid/buckets/WP_20150326_16_14_06_Pro_zpszjsgmcyr.jpg

quick flip again and ditto t'other side............ :smile:

Bild
Originalets URL: http://i1275.photobucket.com/albums/y450/v8druid/buckets/WP_20150326_16_26_40_Pro_zpsjfqwyjbk.jpg

Bild
Originalets URL: http://i1275.photobucket.com/albums/y450/v8druid/buckets/WP_20150326_16_26_49_Pro_zpszpmffyi8.jpg

set it up, the right way up for a 'bit of grinding'!! :vissla: :sad:

Bild
Originalets URL: http://i1275.photobucket.com/albums/y450/v8druid/buckets/WP_20150326_17_16_54_Pro_zpsdovpjgqt.jpg

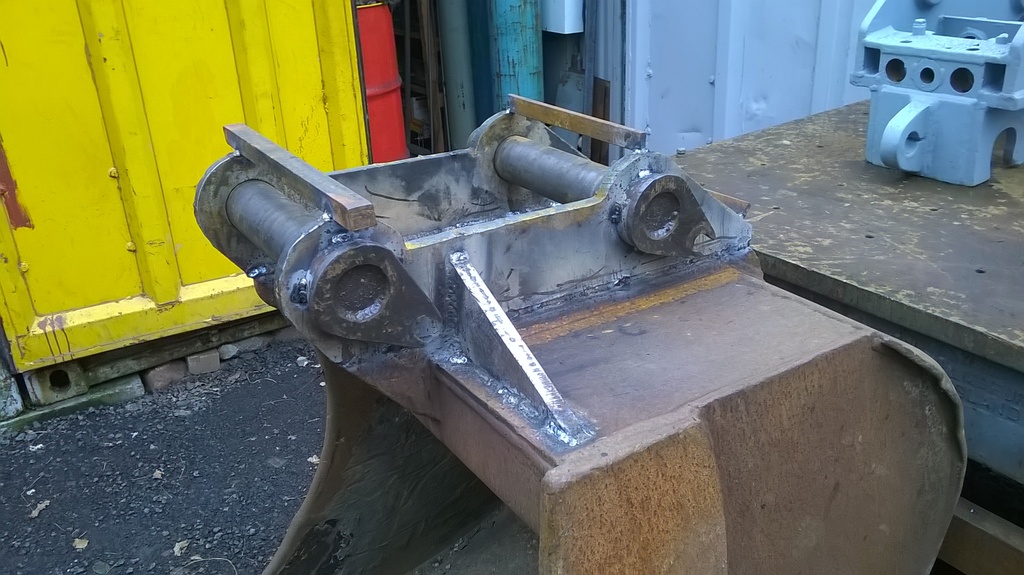
and a while later ended up with this ......... :thummar:

Bild
Originalets URL: http://i1275.photobucket.com/albums/y450/v8druid/buckets/WP_20150326_18_08_08_Pro_zpsg4dvs4et.jpg

Ready for some new cheeks to get planted on. :grin:

The originals were, as I say, too close together, wrong centres and only 50mm pins, which was pretty small, considering the size of this bucket and had that bend in the front end of one cheek!! :sad: :uupps:

Having had a good look at this, it's going to want a bottom at some point in the future, but'll stick a bit of action first. :cool:
Found a 2 footer, virtually identical to this one on Fleabay last night, for not a huge amount ........ but in need of/will need cheeks, as can only be expected - 'Drema does not seem to have what one could call 'std' dimensions!! :uupps: :sad:

knocked out a couple of 20mm profiles for some cheeks to replace the 25mm ones that came off the 3 footer .......... :smile:

Bild
Originalets URL: http://i1275.photobucket.com/albums/y450/v8druid/buckets/WP_20150327_16_47_11_Pro_zps4g18golc.jpg

......... to sit back on there :vissla:

Bild
Originalets URL: http://i1275.photobucket.com/albums/y450/v8druid/buckets/WP_20150327_16_46_56_Pro_zpsn0atghbk.jpg

Can see now why I left the front triangles on there ! :grin:

Then set about 'em with the Ying Tong ......... More about this in a later post. :vissla:

Bild
Originalets URL: http://i1275.photobucket.com/albums/y450/v8druid/buckets/WP_20150327_17_40_35_Pro_zpso5gf56nq.jpg

Hole no 9 with it and still nice and sharp - the drive spigot however wasn't looking too hot half way through no 10 !!!! :sad:

So it looked like it may have to get a no. 3 morse sleeve welded to it in the near future, but is gonna leave me a bit short on travel!! :sad:

So I dug out a collet chuck set that was too good to not keep, when I was clearing out my old workshop, (glad I did) and spent an hour cleaning up a collet to take the No. 3 sleeve, which'd give me the required depth from the mandrel of the mag stand to hopefully finish off No. 10 hole, produce 11 & 12 and hopefully several more yet. :vissla: :smile: :thumme:

The Ying Tong has done remarkably well, considering I'm giving it some sort of testing, on what I'm asking of it!! :uupps:

The drive left a lot to be desired, unfortunately and was succumbing to the grief of driving that gert hole saw attached to it :uupps: :grin:

Bild
Originalets URL: http://i1275.photobucket.com/albums/y450/v8druid/buckets/WP_20150328_11_47_39_Pro_zpspuehoqps.jpg

No matter how frequently I check the chuck for tightness! It inevitably worked loose as it's as soft as the proverbial tish!!

So...... it got one of these welded to it this morning........ :smile:

Bild
Originalets URL: http://i1275.photobucket.com/albums/y450/v8druid/buckets/WP_20150328_11_47_32_Pro_zpsazfphnmg.jpg

A #2 to #3 morse taper sleeve and was going to use my Collet chuck assembly to drive it :cool:

Bild
Originalets URL: http://i1275.photobucket.com/albums/y450/v8druid/buckets/WP_20150328_11_48_10_Pro_zpsdqqgql9x.jpg

Bild
Originalets URL: http://i1275.photobucket.com/albums/y450/v8druid/buckets/WP_20150328_11_48_52_Pro_zps3n7etmsu.jpg

As it's a good solid bit of kit!! :thummar: Tool room rigidity! :cool:

Hole #10 got finished off with a different drive to the Ying Tong, :???: for reasons I can not for the life of me recall at this moment in time????? :???: :vissla:

Bild
Originalets URL: http://i1275.photobucket.com/albums/y450/v8druid/buckets/WP_20150328_14_36_59_Pro_zpsgf8g0src.jpg

Bild
Originalets URL: http://i1275.photobucket.com/albums/y450/v8druid/buckets/WP_20150328_14_37_07_Pro_zps0r0iqylf.jpg

But 11 & 12, got the collet chuck treatment and good it was too!! :cool: :grin: :grin:

Both the alternate drives were too tall for conventional use of the mag, :???: so had to improvise a bit and make sure nothing was gonna make a bid for freedom :uupps: - or move a muscle. :grin:
Ying Tong will not stand for any flexing. :eek: :sad:

This plate leaves a lot to be desired in the quality control dept., :sad: even though its cert.ed and traceable (supposedly) :eek: , I reckon it's also a bit of Ying Tong's finest too :uupps: :sad: - has hard nodules in it (where they don't smelt the scrap properly in the pot!!) :sad: :huh:
Gives the cutter hell and me palpitations when I hear it hit a hard spot!!! :uupps: :uupps:

Used to get it a lot in UBs and big flats - would take all the bloody teeth off the bandsaw blades!! At 60 quid a blade, a couple in a day used to make for a very depressed/pissed off Druid!! :uupps: :sad: :huh:

Actually lost a TCT tooth on one bit that day, but it's still hanging in there!! :cool: :uupps:
Patience is a virtue and one that is needed by the dumper load, to get away with what I'm asking of this lil' cutter. :smile:

I may need to invest a further 12 quid shortly, as it's getting a tad tired, but it's got four bosses to ream/bore tomorrow, then it can have a rest for a little while!! :grin: :grin:

Weather was been less than optimal here that day - ('kin freezing actually and 'damp'), but ploughed on and ended up with this, at close of play. :smile:

Bild
Originalets URL: http://i1275.photobucket.com/albums/y450/v8druid/buckets/WP_20150328_19_17_21_Pro_zpsrmjoap2n.jpg

Bild
Originalets URL: http://i1275.photobucket.com/albums/y450/v8druid/buckets/WP_20150328_19_17_34_Pro_zpsphsduo88.jpg

As you can tell - 'twere dark-ish, by the time I'd persuaded said Ying Tong through both profiles (between other things, of course)!!

Plenty to plod on with though !!! :vissla:

Re: Druid's 'Drema's Druidfab Attachments !!

InläggPostat: 14:23:04, 17-04-2015
av kkildal
:thummar:

Re: Druid's 'Drema's Druidfab Attachments !!

InläggPostat: 21:45:14, 17-04-2015
av V8Druid
kkildal skrev: :thummar:


Cheers Boyo :grin: :thumme:

Re: Druid's 'Drema's Druidfab Attachments !!

InläggPostat: 21:48:16, 17-04-2015
av V8Druid
thought I'd have a couple of hours boring out some bosses I cut a few weeks ago, whilst I had some guide holes. :smile:
I need some for this set of cheeks :thumme: and could really do with fitting the ones on the fork cheeks too, :thumme: to keep it centred up, :smile: especially under the VA-r's pick ups and spread the loading on the pins :smile: - not that those big ol' 70s notice a lot!! :grin:

The bosses are cut from engineering tube which was bought as 70.3mm ID, but when it turned up was only 69.3mm ID :sad: :sad: :sad: :huh:
As i'm lacking a lathe at the moment, I've had to 'improvise' :vissla: :smile:

My methodology is to stitch 'em to the cheek plates and bore 'em out with the Ying Tong :smile: - Oh for my 14" chuck on my old DS&G lathe - would be so much quicker!! :vissla: :huh:
However, that was then and this is now - improvise is the current name of the game !! :smile: :smile: :thumme:

Bild
Originalets URL: http://i1275.photobucket.com/albums/y450/v8druid/buckets/WP_20150329_15_49_29_Pro_zps0knatzpm.jpg

Bild
Originalets URL: http://i1275.photobucket.com/albums/y450/v8druid/buckets/WP_20150329_15_49_24_Pro_zpszrf74ymu.jpg

It works sufficiently well for my purposes. :smile: All the pins are captives and this is just to add additional bearing points/spread the loading!! :vissla:

Was just getting into #7 when the bloody heavens opened again ........ :uupps:

Bild
Originalets URL: http://i1275.photobucket.com/albums/y450/v8druid/buckets/WP_20150329_17_03_26_Pro_zpsilhgzwtc.jpg

and it was a case of cover up quick and head for cover. :uupps: Was just contemplating calling it a day .......... an' it stopped again !!!!!! :grin: :vissla: :uupps:

Got #8 done as well, :smile: but with ever darkening skies, decided to call it quits, before the mag got PO-ed with getting wetted! :sad: :eek:

Bild
Originalets URL: http://i1275.photobucket.com/albums/y450/v8druid/buckets/WP_20150329_17_34_18_Pro_zpsr0qelmbf.jpg

Bild
Originalets URL: http://i1275.photobucket.com/albums/y450/v8druid/buckets/WP_20150329_17_34_32_Pro_zpsb7yh9wuh.jpg

Bild
Originalets URL: http://i1275.photobucket.com/albums/y450/v8druid/buckets/WP_20150329_17_34_26_Pro_zpsuy7a05g2.jpg

Decided to put these together on the surface table, with temp braces & spreaders, to drop onto the bucket, as a unit, to ensure trueness, etc.! :thummar:

One day, when I've a quickie under the VA-r :grin: as well as the Miller, on top, :smile: I'm going to curse myself for putting me to all this effort, :uupps: when a couple of profiles, with two 70mm holes blown in 'em and a couple of fixed pins welded in will be all I need to bother with :grin: :grin:

One day!!!!!!!

It was another grim day again, but dry for a while, on and off, so got this ......... :sad:

Bild
Originalets URL: http://i1275.photobucket.com/albums/y450/v8druid/scans/WP_20150330_14_35_49_Pro_zpsooaclowb.jpg

Bild
Originalets URL: http://i1275.photobucket.com/albums/y450/v8druid/scans/WP_20150330_14_36_04_Pro_zpsmhgd5nuo.jpg

put back together ....... :smile:

Bild
Originalets URL: http://i1275.photobucket.com/albums/y450/v8druid/scans/WP_20150330_14_53_10_Pro_zpsnfwwl6gy.jpg

(Can not believe the Ying Tog survived doing that to the tang!!!!!) :uupps: :uupps:

......and finished boring ALL my bosses, whilst I had some guide holes to use. :grin: :cool:

Bild
Originalets URL: http://i1275.photobucket.com/albums/y450/v8druid/buckets/WP_20150330_14_55_06_Pro_zpsayhhfzob.jpg

Finished the last one off just as the 'precipitation' started again and didn't it ever precipitate!!!!!! :uupps:

Pottered about at a few bits an' bobs, after I'd tidied up and sussed/cut a spacer for setting up the cheeks :cool: - when it ain't so wet!! :grin: :grin:

Re: Druid's 'Drema's Druidfab Attachments !!

InläggPostat: 17:51:47, 18-04-2015
av CountyBruff
Why so surprised about some rain??
You live in GB !!

Re: Druid's 'Drema's Druidfab Attachments !!

InläggPostat: 00:26:59, 19-04-2015
av V8Druid
CountyBruff skrev:Why so surprised about some rain??
You live in GB !!


LOL Too bloody right there, :sad: not only GB, but Wales!!!! :uupps: :uupps: :grin:
All I can say is; thank f*** it's not snow! :uupps: :uupps: :uupps: :hurra:

Re: Druid's 'Drema's Druidfab Attachments !!

InläggPostat: 01:42:32, 20-04-2015
av V8Druid
Not quite so wet and wild the next day - occasionally pee-ed on but on the whole dry-ish! :eek:

Got the cheeks clamped and stitched up on the bench, first off, using the pins as datums for true/level/square. :grin:

Once it was all solid, picked the bucket up to a flatter orientation to sit 'em on and lifted 'em across onto the old cheek roots, after suitably vee-ing the required bits on both and tacked 'em in position, before putting some decent stitches on to keep 'em put. :vissla: :grin:

Bild
Originalets URL: http://i1275.photobucket.com/albums/y450/v8druid/buckets/WP_20150401_13_51_13_Pro_zpscyn9tmza.jpg

Bild
Originalets URL: http://i1275.photobucket.com/albums/y450/v8druid/buckets/WP_20150401_13_51_20_Pro_zpsqssl9lig.jpg

Bild
Originalets URL: http://i1275.photobucket.com/albums/y450/v8druid/buckets/WP_20150401_13_51_35_Pro_zpstn1iralm.jpg

Bild
Originalets URL: http://i1275.photobucket.com/albums/y450/v8druid/buckets/WP_20150401_13_51_43_Pro_zpsclkkki3k.jpg

Tidied up a few triangles I had sat, for a couple of decent gussets and got those stitched in place too ......... :smile:

Bild
Originalets URL: http://i1275.photobucket.com/albums/y450/v8druid/buckets/WP_20150401_15_02_31_Pro_zpsvza2w8md.jpg

Bild
Originalets URL: http://i1275.photobucket.com/albums/y450/v8druid/buckets/WP_20150401_15_02_39_Pro_zpsgstpuzhj.jpg

Bild
Originalets URL: http://i1275.photobucket.com/albums/y450/v8druid/buckets/WP_20150401_15_02_46_Pro_zpsijbn6o1t.jpg

Before a lot of sequential root runs got laid down and replaced a few that had had to go/had never been done from new (under the centre angle). :sad: :smile:

Bild
Originalets URL: http://i1275.photobucket.com/albums/y450/v8druid/buckets/WP_20150401_17_05_00_Pro_zps1mk7ixsr.jpg
And filled in the odd 'gas axe' gouge !! :grin:

stitched the pin bosses on and eventually ended up with this, :grin: fully rooted and now in need of a.n.other pass in places and capping off everywhere. :vissla:

Bild
Originalets URL: http://i1275.photobucket.com/albums/y450/v8druid/buckets/WP_20150401_18_28_41_Pro_zps34k4bwgi.jpg

Bild
Originalets URL: http://i1275.photobucket.com/albums/y450/v8druid/buckets/WP_20150401_18_28_51_Pro_zps7mejiyc3.jpg

Bild
Originalets URL: http://i1275.photobucket.com/albums/y450/v8druid/buckets/WP_20150401_18_29_01_Pro_zpsyggw1vsn.jpg

Bild
Originalets URL: http://i1275.photobucket.com/albums/y450/v8druid/buckets/WP_20150401_18_29_08_Pro_zps5lbhmyqd.jpg

May just wake up a mig for the rest of it, :smile: which I'd like to do downhand rather than the positional that this was all done at, so will need to roll the bucket a few times, as I do it, but much quicker and better looking results !

There'd been a consumables supplier in Hereford who had been punting some serious offers on rods in my inbox of late.
Stepson and his wife were home for a few days and going to Hereford that morning, so got him to pick me some up, :thumme: after paying for 'em on the phone first thing.
They arrived, just as I'm getting real low in the rod dept. and got tried out straight off. :smile:
Different to anything I've ever used in the 6013 range before - took a rod or two to get the suss! :uupps:
Got to drown the arc virtually, like hand held submerged arc!!
POP for a beginner to use - the arc is virtually self sustaining within the melt pool - wierd!! :uupps:
Ain't the best weavers I've ever used, but put down a decent pass and overlay well.
At 18 quid a 20 kg carton I will get used to 'em, but at that cost, could use 'em for knitting needles. :smile: :smile:
Can't say I'm disappointed with 'em though.
They smell like the old Philips Vodex rods, which were a decent enough electrode. :cool:

Oh and for the curious - although it may look as though the cheeks are back in exactly the same position as the ones I took off - they ain't !!

Originals were 25mm thick, 270 between and only 200 between the bosses, which were only 380 ctr.s and 50 dia pins.

They're now 20mm cheeks, 280 between, (I decided not to put the extra 20mm bosses inside this one - it's good enough for the likes of the S type pick ups, so that'll do me) with my 400 ctr.s and 70mm pins installed!
So the outer faces of the cheeks are where the originals were and the inners 5mm inset from the cheek roots, as you may have noticed! :vissla: :grin:

Re: Druid's 'Drema's Druidfab Attachments !!

InläggPostat: 17:39:33, 20-04-2015
av V8Druid
I threatened to do it ? so got out my lil? MIG . :smile:
180 A on 240v ? British built unit I had off an old customer, donkey?s ago ? he?d had it a while, but couldn?t get on with it. :vissla:
Bit unfair really to awaken it from its slumbers and ask it for full volume, but it did real well. :smile:
Another 20 amps would?ve been nice, but just backed the wire feed off a bit to give it more of a spray for penetration?s sake. :thumme:

Must be 5 or 6 years since it was last plugged in ? used to use it on my old RR classics, for panel and chassis repairs/work. It came with a lovely lil? Tweco 150 A torch ? finger and thumb job if you want to ? could write with it!! :thummar:

Thought I?d better stick something better on, so screwed a Binzel MB250 onto the Euroconnector and a roll of 0.8 - away to go!!

Bild
Originalets URL: http://i1275.photobucket.com/albums/y450/v8druid/buckets/WP_20150403_14_30_40_Pro_zps1b6i8nug.jpg

Bild
Originalets URL: http://i1275.photobucket.com/albums/y450/v8druid/buckets/WP_20150403_15_44_24_Pro_zpsukiy7p2c.jpg

Was going very well and so much quickler; had the last 3 inch pass to do on the weave and it suddenly made a strange noise over my right shoulder, where it was sat in a box doorway? flipped my mask just in time to see this humungous cloud of white smoke/steam?? Emanating from yon MIG and doorway! :uupps: :uupps:
Leapt up and went to knock it off, by which time it?d stopped issuing forth from the cabinet and returned to a normal sound??????
The smog cleared and I whipped off the side panel (on 2 Zeus fasteners). The inside of the panel was covered in this jelly like substance (& missing its paint!!!) and the smoothing capacitor, across the rectifier, was looking a tad hot. The top seal had split around the edge of it and presumably launched it guts at the panel? so that?s where the jelly?d come from !! :uupps:

Anyway, thought sod it ? ?in for a penny?, etc. and switched it back, on with the side cover off and watched for a minute ? now?t ? so struck an arc ? no prob.s! :smile:
Only had 3 more inches to do, so I charged on.
If anything it was a better arc and more beans!!!! :vissla:

Finished off, cleaned up the MIG, promising it a new capacitor soon, put it away and ground the braces/spreaders off, once it?d cooled off a bit. :thumme:

Bild
Originalets URL: http://i1275.photobucket.com/albums/y450/v8druid/buckets/WP_20150403_16_56_34_Pro_zpsadxfth1r.jpg
Flipped it back over onto its bottom with the forks and stuck the pins in it to give it a try for a fit!

Bild
Originalets URL: http://i1275.photobucket.com/albums/y450/v8druid/buckets/WP_20150403_17_11_03_Pro_zpsimlulfhz.jpg

Looked pretty fair I thought and had some nice angles full either way. Wasn?t gonna be much escaping from there!! :thumme:

Bild
Originalets URL: http://i1275.photobucket.com/albums/y450/v8druid/buckets/WP_20150403_17_13_11_Pro_zpsbo7yomvs.jpg

Some of you may disagree with the next move ........ :vissla:

Bild
Originalets URL: http://i1275.photobucket.com/albums/y450/v8druid/buckets/WP_20150403_17_48_48_Pro_zpsprwexrxk.jpg

........but this is more use to me with an edge, than toothed :smile:

Bild
Originalets URL: http://i1275.photobucket.com/albums/y450/v8druid/buckets/WP_20150403_18_08_05_Pro_zps8ph6equp.jpg

I?ve got a 4 foot toothed, that came with the ?Drema and if I ever manage to find some Bofors teeth, :sad: I?ll have that beast of an Akerman 3 footer too. I could always bolt these Geiths back on, if I ever wanted to, ATM, but I?ve ?plans? for this ?un, ultimately. :grin:

Bild
Originalets URL: http://i1275.photobucket.com/albums/y450/v8druid/buckets/WP_20150403_17_48_29_Pro_zpsn0vveadt.jpg

I'm also considering adding a.n.other edge to/under this and extending the side cheeks to support it, giving me a longer toe-ed bucket :thumme:

Finished off the day with a quick coat of HBZP ? looks a different bucket eh? :thummar:

Bild
Originalets URL: http://i1275.photobucket.com/albums/y450/v8druid/buckets/WP_20150403_19_51_16_Pro_zpsoy3llxlm.jpg

Re: Druid's 'Drema's Druidfab Attachments !!

InläggPostat: 18:46:16, 20-04-2015
av PerJohansson
Nice! :)

How come you use 6013 type electrodes? I would definitely prefer a 7018 any day of the week.

Re: Druid's 'Drema's Druidfab Attachments !!

InläggPostat: 19:28:25, 20-04-2015
av jörgen.ottosson
I don´t know about suppliers on "The island" but its not hard to find around here..... (I believe I got some out in the "shed" as well fore some of my buckets .... :klia: )

http://www.entrack.se/produkter.pab?category=146|64

Re: Druid's 'Drema's Druidfab Attachments !!

InläggPostat: 22:59:17, 20-04-2015
av V8Druid
PerJohansson skrev:Nice! :)

How come you use 6013 type electrodes? I would definitely prefer a 7018 any day of the week.


The Lo-His are OK for most down hand or vert-up, but I find the 6013s are a great rod for virtually any all-positional work - could hang upside-down by your toes, welding under something with 'em and get a decent result! :grin: :grin: A great 'general purpose' rod.
The 7018s are a greater tensile strength on the whole though - just didn't happen to have any to hand at the time either :vissla: :smile:

Re: Druid's 'Drema's Druidfab Attachments !!

InläggPostat: 23:14:17, 20-04-2015
av V8Druid
jörgen.ottosson skrev:I don´t know about suppliers on "The island" but its not hard to find around here..... (I believe I got some out in the "shed" as well fore some of my buckets .... :klia: )

http://www.entrack.se/produkter.pab?category=146|64


Thanks very much for the link Jörgen - those look like just what I'm after :cool: :cool:
I'll go and have another measure up tomorrow and see if I can find some to match. :smile: :grin: :thumme: :hurra:
Can't imagine they're going to be cheap though - they're a BIG tooth :uupps:

As for suppliers on ''the Island'' - Like looking for hen's teeth ol' mate - bloody hopeless :uupps: :sad:

Re: Druid's 'Drema's Druidfab Attachments !!

InläggPostat: 00:36:13, 11-06-2015
av V8Druid
Now this is a.n.other little 'diversion' I'd been 'pottering' with and needed a little input/help/info. from the guys on t'other forum.
Bild
Originalets URL: http://i1275.photobucket.com/albums/y450/v8druid/buckets/2014-10-19155329_zps7d5d4fd2.jpg

Was gonna hold off on putting it up 'til I'd finished it, but as I say needed some input on the locking mechanisms for it and couldn't find any decent pix on't 'net!!

Bild
Originalets URL: http://i1275.photobucket.com/albums/y450/v8druid/buckets/2014-10-24143954_zpsb51d48f7.jpg


To quote a well known Rolf "can yer tell what it is yet"?
Bild
Originalets URL: http://i1275.photobucket.com/albums/y450/v8druid/buckets/2014-10-24143954_zpsb51d48f7.jpg

Bild
Originalets URL: http://i1275.photobucket.com/albums/y450/v8druid/buckets/2014-10-24144002_zpsec3fedc1.jpg

it occurred to me, that instead of re-cheeking the two B20 buckets, I'd bought from Sheffield, it'd be easier to make an adapter to fit the both of 'em, as I'd never be using 'em together !!

Bild
Originalets URL: http://i1275.photobucket.com/albums/y450/v8druid/buckets/2014-10-31140606_zps8bfceef8.jpg

Bild
Originalets URL: http://i1275.photobucket.com/albums/y450/v8druid/buckets/2014-10-31140615_zps92aced95.jpg

Bild
Originalets URL: http://i1275.photobucket.com/albums/y450/v8druid/buckets/2014-10-31141626_zps84eec32e.jpg

It fitted a treat on both buckets .... :hurra:

Bild
Originalets URL: http://i1275.photobucket.com/albums/y450/v8druid/buckets/2014-10-31142622_zpsa3869309.jpg

there were a few bits of tweeking left on it and a few repairs / bits 'n bobs to do on the buckets too.

Re: Druid's 'Drema's Druidfab Attachments !!

InläggPostat: 00:42:02, 11-06-2015
av V8Druid
Bild
Originalets URL: http://i1275.photobucket.com/albums/y450/v8druid/buckets/2014-10-31141646_zps8a60e9c4.jpg

Bild
Originalets URL: http://i1275.photobucket.com/albums/y450/v8druid/buckets/2014-10-31141709_zpsb6718d3f.jpg

Bild
Originalets URL: http://i1275.photobucket.com/albums/y450/v8druid/buckets/2014-10-31144831_zpsf7462b5d.jpg

Bild
Originalets URL: http://i1275.photobucket.com/albums/y450/v8druid/buckets/2014-10-31142924_zps85c659d5.jpg

I'D a few ideas of my own for a locking mechanism, but would liked to have seen how this was done originally, so would've appreciated any pix or pointers/info. as to how it was achieved, that I could find or get ?

couple of 'pressure pads' needed fitting and fettling and a few mods to the bucket's points that are missing/need some finessing/straightening back out, but it was there or there abouts, other than the latch!

Bild
Originalets URL: http://i1275.photobucket.com/albums/y450/v8druid/buckets/2014-10-31145113_zpse3d3d277.jpg

Bild
Originalets URL: http://i1275.photobucket.com/albums/y450/v8druid/buckets/2014-10-31144458_zps29f360ea.jpg

Then down to some repairs to the 6ft bucket and a front end mod on the 3 footer, unless I could find it some of those elusive Bofor's teeth for it, in the near future!!

Bild
Originalets URL: http://i1275.photobucket.com/albums/y450/v8druid/buckets/2014-10-31142645_zpsef58acc6.jpg

Rebuilt a few of the wear/worn points on both of 'em and they're both servicable.

Bild
Originalets URL: http://i1275.photobucket.com/albums/y450/v8druid/buckets/2014-10-31142721_zps4e94a7f6.jpg

So it was a case of, any pix of what the latch looked like on a B20/S20 would've been gratefully received - mechanical/manual preferably, but might have been able to mod. a more recent system, if the idea was suitable!!


I thought I knew how they worked, but needed it confirming!! :smile:

Re: Druid's 'Drema's Druidfab Attachments !!

InläggPostat: 00:53:17, 11-06-2015
av V8Druid
It sure was a quicker option than re-cheeking the two buckets though and could be used on any B20 that happened along!! :vissla:

Spent an hour or two pondering the locking system, between down-pours and thought I had it sussed - for both systems (manual and a hydraulic locking idea).

Bit annoying that I found there was a variation between the two bucket's hitches - had em both on/off, marked up all the critical points and sussed the differences, so had yet more variables to enter into the equation, to allow for.

Hoped that this would be a simple solution.

Had a bit of go at the adapter lock, again between the down-pours !!


First had to knock up a wedge ..............

Bild
Originalets URL: http://i1275.photobucket.com/albums/y450/v8druid/buckets/2014-11-04135509_zps5ff29523.jpg

Bild
Originalets URL: http://i1275.photobucket.com/albums/y450/v8druid/buckets/2014-11-04135501_zpse3818a7e.jpg

.......with a tail on which would eventually form part of a hydraulic grip, if I went that route.
'Fraid I didn't get too many pix that day as was trying to get on between the bloody rain storms.
As per usual then, (that time of year) the light beat me - sort of, but did take a few of the progress thus far with flash - some better ones in the daylight were to follow

Bild
Originalets URL: http://i1275.photobucket.com/albums/y450/v8druid/buckets/IMG_3811_zps9d64419c.jpg

Bild
Originalets URL: http://i1275.photobucket.com/albums/y450/v8druid/buckets/IMG_3810_zps06829adb.jpg

The bolts were tapped into the 30 mm square bar which pulled it against the back of the wedge from the forked mounts either side of the wedge, which also kept the wedge end located centrally in the hook.


Bild
Originalets URL: http://i1275.photobucket.com/albums/y450/v8druid/buckets/IMG_3813_zps6291bf8a.jpg

the piece of 30 mm square, sat on top of the wedge's tail, fits just under the 70 mm pin and will be suitably 'fashioned' to provide the hydraulic lock against the 30 mm 'draw bar', holding the wedge, or simply replaced with a 30mm longer push rod from the miller's clamp, to the back of the wedge.

Bild
Originalets URL: http://i1275.photobucket.com/albums/y450/v8druid/buckets/IMG_3812_zps4df0434d.jpg

To remove it you simply slack off the two 'position locking nuts' (which may get lock/double nutted) and currently lift the draw bar out, with the bolts.
It was going to get a retainer/keep lug, across the top of the back of the wedge to prevent it lifting without first being slacked off 10-12 mm and slid forward/backward to clear the retainer, before being lifted clear.
This would also retain the hydraulic push-rod version too!

Had to 'fettle' some guides and retainer lugs here and there and trim a few bits to suitable lengths, but the basics were there or there abouts.

Had to have a reasonable degree of adjustment on the wedge slide and lock as the two buckets engage in differing positions in relation to the hooks, relative to the adapter (which is annoying and may get 'looked at')!!


They'll both lock on manually easily, with the same mechanism, but will need differing pusher rods to lock them hydraulically, otherwise, if I didn't 'tweek' the annoying differences between the mounts!!


All in all though I was fairly pleased with the result.
I'd have 'em hanging on there shortly, in full dump position!!

Well here?re the ones taken in the daylight for yer ......... :vissla:

Bild
Originalets URL: http://i1275.photobucket.com/albums/y450/v8druid/buckets/IMG_3817_zpsbd5b01d0.jpg

And the 3 footer on full dump, happily sat on the adapter ...... :cool:

Bild
Originalets URL: http://i1275.photobucket.com/albums/y450/v8druid/buckets/IMG_3820_zps8285ef49.jpg

Before getting too far into ?finessing? the lock system I thought I?d turn my attentions to the 6 footer. Got it on and locked for a trial and it held quite happily on the same full dump position ....... but ...............

Bild
Originalets URL: http://i1275.photobucket.com/albums/y450/v8druid/buckets/IMG_3827_zpsb2685120.jpg

I wasn?t at all happy with the hook shape on the 6 footer and having checked it, it was a few degrees out from the 60° it was supposed to be ? good job the 3 footer was an OE factory built unit from Akerman and that I chose that one to ?build around?!!

Bild
Originalets URL: http://i1275.photobucket.com/albums/y450/v8druid/buckets/IMG_3825_zps31036aa4.jpg

A bit of careful measuring and setting out, followed by some none too easy disc-ing, with a 1mm disc and the situation was ?in hand?

Bild
Originalets URL: http://i1275.photobucket.com/albums/y450/v8druid/buckets/2014-11-05163608_zpsb487e834.jpg

Looked a lot better with the wedge much deeper into the hook ........

Bild
Originalets URL: http://i1275.photobucket.com/albums/y450/v8druid/buckets/IMG_3838_zpsbe573d8f.jpg

Just had to sort out the packer plates, on the bucket, under the adapter to get everything in the right spot and this un?ll be OE spec. too!!


Spent a bit of time fitting the pressure point/thrust pick ups, re-fitting the bosses, which I?d taken off whilst assembling the adapter (?cos they were a PITA for lining it all up), touching/beefing up a few of the more critical welds, on the bench and securing the pins in position ...............

Bild
Originalets URL: http://i1275.photobucket.com/albums/y450/v8druid/buckets/IMG_3832_zps51dac809.jpg

Before hitching it back up, yet again, for yet another trial fitting to measure up for the thrust points on the buckets.

Bild
Originalets URL: http://i1275.photobucket.com/albums/y450/v8druid/buckets/IMG_3834_zpsfb38650c.jpg